Sewing the skin on a frame kayak
Finishing off the placement of the fabric
Apologies for the abrupt ending of the previous post; google seems to have a limit of nine photos you can upload at one time.
Once the fabric was stretched round the bow with the windlass it was pinned in place with a series of 4 or more upholstery thumbtacks.
 Larger than the office type, they are robust and easily removed. I do not use staples - even the smaller ones used domestically, as they can cut a single fibre. This is acceptable if you are using canvas but synthetic fibres slip over each other.
 Once the bow was secured the dots along the keel were pulled into line and the fabric pinned in place so that it was symmetrical along the boat. This takes a bit if pulling especially towards the bow where the tension will cause the fabric to slip one side or the other.
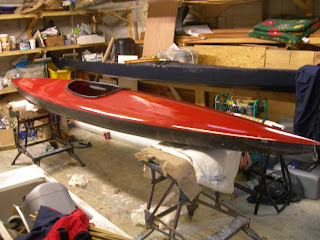
 Here you can see the fabric pinned in this way so that the fabric will drape at the bow without wrinkles. You can also see the longitudinal hollows midships, again an effect of the tension. These will be removed when the boat is put right way up and the process of tensioning the fabric crossways begins.
 I have begun the process in the middle of the boat, gently pulling out the concaves - first from one side and then the other. If I were to pull any harder I would make holes in the fabric along the keel - where it pulled against the thumbtacks.
I started off with all the spring clamps I could find to hold the fabric in place. When I ran out of these I used thumbtacks instead.
 Then I went along again replacing the clamps with thumbtacks, and then drawing pins when I ran out of those. I was trying to achieve an even tension - not too tight. I have found that it is better to err on the side of gentleness: a hot iron later can literally iron out any wrinkles through shrinkage. This is one of the advantages of polyester.
Setting up the seam
The fabric each side of the centre needs about an inch overlap across the other side. Through having cut too fine in the past - and then having had to sew bits of fabric on to the edges in order to gain the necessary overlap; nowadays I cut the fabric wide when making the initial cut on the floor. Thus I had
 to cut the fabric again while it was in place. One side at a time I marked the inch overlap with a pencil and then adjusted the fabric so that it was in the centre of the stringer and then cut along the marks with a red hot cutter.
 This is an old chisel with the edge rounded off. I was wearing a mask as the fumes given off when the polyester melts really goes for my lungs. Once cut each side of the fabric should overlap by about an inch, but this is often reduced near the bow and stern where it all gets narrow and cramped. There must be enough to go once round the piece of core rope.
Rolled Seams
Below you can see the map pins used to hold the seam in place and the core rope or in this case braid around which the fabric is rolled.
It is necessary to use such a seam with this fabric as it pulls badly on a thread. Although this looseness is an advantage in enabling the fabric to drape well, making a rolled seam is a time consuming business; however the result does look good.
 Next Post; I will go through the whole process of rolled seams.
Apologies for the abrupt ending of the previous post; google seems to have a limit of nine photos you can upload at one time.
Once the fabric was stretched round the bow with the windlass it was pinned in place with a series of 4 or more upholstery thumbtacks.


I started off with all the spring clamps I could find to hold the fabric in place. When I ran out of these I used thumbtacks instead.

Setting up the seam
The fabric each side of the centre needs about an inch overlap across the other side. Through having cut too fine in the past - and then having had to sew bits of fabric on to the edges in order to gain the necessary overlap; nowadays I cut the fabric wide when making the initial cut on the floor. Thus I had


Below you can see the map pins used to hold the seam in place and the core rope or in this case braid around which the fabric is rolled.
It is necessary to use such a seam with this fabric as it pulls badly on a thread. Although this looseness is an advantage in enabling the fabric to drape well, making a rolled seam is a time consuming business; however the result does look good.

Comments
Post a Comment