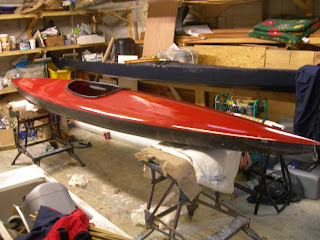
Skinning a Kayak - Adding the Cockpit Hoop
The Cockpit Hoop
These are generally made with steamed wood wrapped around a frame. I have made them of both Oak and Cedar and found the latter just as strong and much lighter. It is important to use straight grained, green wood for this. The actual process of making one is not covered on this post, which is about skinning the kayak.
Before fitting I make sure that the inside bottom edge is well rounded and sanded smooth. A sharp edge will catch and put a void in many fabrics.
Starting the Process
 I start by gently pulling the fabric inside the hoop and securing with spring clamps; however the fabric will resist much of this until it is trimmed. I generally try to leave a couple of inches spare above the rim and seal the trimmed edge with a heat gun. Then I am able to ease more fabric into the hoop and using nails pushed through the sewing holes in the hoop to secure, but gently does it or you will pull voids in the fabric.

A New Approach
It was at this stage that I decided to do something different this time, for I had always found it difficult to pull much tension into the hoop without the prior varnishing of the fabric inside the hoop to stop it pulling on the nails.
So instead I wrapped the excess fabric around the same rope core as I had been using on the rolled seams described in the last two posts.
 I cut a piece of braid about a foot longer than the hoop circumference and placed the centre at the rear of the hoop, rolled some fabric on to it and then pushed it over one of the nails protruding inside the rim, and then started to take it round one side - over each of the nails; secured everything in place with a clamp, and then caught up on the other side, and so on until I had overlapped a little at the front (NB the seams are generally unpicked inside the hoop to facilitate this).
Then I started again at the centre of the cockpit rear, rolling more and pulling much more this time to take out the slack around the hoop, and each nail - removed one at a time, is replaced by a thread taken through the hole in the hoop followed by the centre of the rolled fabric tube, and then back again, first through the rolled fabric tube into the next hole in the hoop.
This is what can be seen in the photo above where the needle is about to come back out through the cockpit hole and through the fabric tube.
Then I started to take it up on the other side ( I had secured half of the thread to go round the other side) . As you can see, I secure the loose ends with a spring clamp.
 I kept on going this way until half of the stitches were in place all the way round.
 And then went round again, the needle this time going the opposite way through the holes so that the alternate gaps were filled with stitches, and there was a full line of stitches with no gaps.
 Whilst doing this second pass it was still possible to continue twisting and pulling the rolled fabric to complete the tensioning. The loose ends were trimmed afterwards to leave me with the neatest cockpit stitch job I had ever done. I will use a rope core again.
Next Post: Ironing the New Skin.
These are generally made with steamed wood wrapped around a frame. I have made them of both Oak and Cedar and found the latter just as strong and much lighter. It is important to use straight grained, green wood for this. The actual process of making one is not covered on this post, which is about skinning the kayak.
Before fitting I make sure that the inside bottom edge is well rounded and sanded smooth. A sharp edge will catch and put a void in many fabrics.
Starting the Process


A New Approach
It was at this stage that I decided to do something different this time, for I had always found it difficult to pull much tension into the hoop without the prior varnishing of the fabric inside the hoop to stop it pulling on the nails.
So instead I wrapped the excess fabric around the same rope core as I had been using on the rolled seams described in the last two posts.

Then I started again at the centre of the cockpit rear, rolling more and pulling much more this time to take out the slack around the hoop, and each nail - removed one at a time, is replaced by a thread taken through the hole in the hoop followed by the centre of the rolled fabric tube, and then back again, first through the rolled fabric tube into the next hole in the hoop.
This is what can be seen in the photo above where the needle is about to come back out through the cockpit hole and through the fabric tube.
Then I started to take it up on the other side ( I had secured half of the thread to go round the other side) . As you can see, I secure the loose ends with a spring clamp.


Next Post: Ironing the New Skin.
Comments
Post a Comment