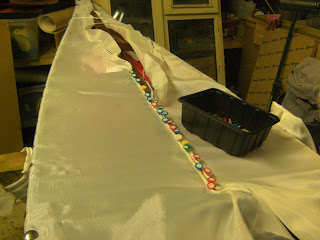
Sewing Rolled Seams on a Skin on Frame Kayak
The Seam ready for Sewing
I finished the last post with the pinned seam ready for sewing:
 but also needed to cover the more difficult ends of the kayak:
 As you can see above the bow came out saggy after the initial stitching. If you look at the way the creases run you can see that I was pulling towards the ends too much and not perpendicular towards the stringer, with the result that the fabric slackened once the stitching was in and the pins removed.

The remedy was to secure the seam with a few stitches and then cut through the stitches with a Stanley knife. Leaving the cut thread in place helped to keep the seams intact.
 Then they were rolled and pinned again, but this time making sure I was pulling straight towards the stringer.
 Once stitched the result was a great improvement and worth the extra effort.
Sewing the rolled seam
What the rolled seam does is to provide a means of tensioning the fabric and taking a secure stitch that will not pull. I believe that they have traditionally been sewn with two threaded needles, each put in opposite ends of the same hole, and then each taken over round and under again, so that you have two thread spirals of opposite twists proceeding down the seam, a little like the DNA double helix.
Although Morris (Building Skin on Frame Boats) suggested taking the needles just under the pinned rolled seam I found that this could easily create voids in the fabric below and always took my needles through the base of the fabric tube. I also found it time consuming as well as the best means I ever came across of pushing the very sharp sailmakers needle into the tips of one's finger, so that you ended up with blood all over the seam. That's why I moved on to the Sewing Awl.
The Sewing Awl
 Above you can see the business end of the Awl. The model I use is the "Speedystitcher" which is manufactured in the USA and sold in most UK Chandlers. The underside of the needle is grooved to take the thread which passes through a rectangular slot near the end. The Speedystitcher comes with two needles; the straight one which I use on cambered decks and the one above with the curved tip that I was using on a flat deck. Each Speedystitcher comes with instructions.
 The handle, shown above is hollow and contains the thread on a spool which emerges from a hole below etc. As you can see above I used it to put a row of stitches straight through the middle of the two seams. Although Morris says in his book that you shouldn't use the stitching to tension the seam with two needles, my experience is that you can put considerable tension into a seam this way because the whole seam with two pieces of rope inside is taking the strain.
How I sew with the Awl
I like to sew about six feet of seam at a time, therefore I pull a full arm span width of thread from the end of the Awl's needle and then, threaded through a separate needle take nearly all of it through the seam where you want to start sewing, leaving just enough for the awl to start working as can be seen in the preceding photo (I leave the needle threaded as it helps the process about to be described).
Then I move the Awl down to where the next stitch is due and push it through (I have found 1cm stitches work fine), and then pull it back a touch so that it slackens the thread below the needle,
 enabling me to pull a loop, as shown above, through which I can then pass the 6ft of thread

 When the Awl is pulled back and the thread on the other side pulled tight a stitch is completed.
 And the next is started, the pins being moved at the last possible moment.
Although I am not sure it is necessary, once I have completed a seam, I then do a second pass of
 stitching, reversing the Awl and thread on the other side each stitch, so that on one stitch, say you push the awl through from the left side, and then on the next stitch from the right side, and so on. This second time round I also take the awl through the base of the seam. The effect is to produce pretty much the same stitch as is achieved with two needles. It give extra security and really enhances the appearance of the seam. For some reason it really impresses people.
At the ends I take the seam round the corners.
 Next post, Sewing the Cockpit Hoop.
I finished the last post with the pinned seam ready for sewing:


The remedy was to secure the seam with a few stitches and then cut through the stitches with a Stanley knife. Leaving the cut thread in place helped to keep the seams intact.


Sewing the rolled seam
What the rolled seam does is to provide a means of tensioning the fabric and taking a secure stitch that will not pull. I believe that they have traditionally been sewn with two threaded needles, each put in opposite ends of the same hole, and then each taken over round and under again, so that you have two thread spirals of opposite twists proceeding down the seam, a little like the DNA double helix.
Although Morris (Building Skin on Frame Boats) suggested taking the needles just under the pinned rolled seam I found that this could easily create voids in the fabric below and always took my needles through the base of the fabric tube. I also found it time consuming as well as the best means I ever came across of pushing the very sharp sailmakers needle into the tips of one's finger, so that you ended up with blood all over the seam. That's why I moved on to the Sewing Awl.
The Sewing Awl


How I sew with the Awl
I like to sew about six feet of seam at a time, therefore I pull a full arm span width of thread from the end of the Awl's needle and then, threaded through a separate needle take nearly all of it through the seam where you want to start sewing, leaving just enough for the awl to start working as can be seen in the preceding photo (I leave the needle threaded as it helps the process about to be described).

Then I move the Awl down to where the next stitch is due and push it through (I have found 1cm stitches work fine), and then pull it back a touch so that it slackens the thread below the needle,


assisted by the aforementioned needle.


Although I am not sure it is necessary, once I have completed a seam, I then do a second pass of

At the ends I take the seam round the corners.

Comments
Post a Comment