Fitting the fabric
Cutting the fabric to shape
As a full size piece of cloth is unmanageable, the first stage is to determine the approximate dimensions of the cloth to be bent to the boat. This is done by measuring the circumference of the craft at points from the bow to the stern. It is important that the measuring tape from which these points are taken is pulled along the keel and round the curvature of bow and stern to where they meet the deck. You see, the cloth will take this path. If you measure points in a straight line from bow to stern the piece of cloth will be too short.
To the circumference at each point is added four inches. That is for the one inch overlap needed for the rolled seam and two inches spare so as not to have to waste a piece of cloth through having made a mistake in the measurements etc. That measurement is halved and the points plotted either side of a straight line lightly drawn on the fabric. The outline of the piece is drawn through the plotted points.
The shape of the cloth will be something like that shown below:

The irony is that I had forgotten to add the extra two inches of fudge factor to this piece and it did not give me enough overlap so I had to cut another piece. It was not wasted however - I gave it to someone who was making a shorter and narrower boat!
On the floor is the notebook in which I had plotted the dimensions and the pair of Kevlar shears I used to cut the fabric, after which I sealed the edges with a heat gun. Although this was quicker and fume free, I was not satisfied with the quality of the edge, so the next piece was cut with my old method.

This involves the use of an old chisel filed sharp on one corner, heated to red heat with a blow torch. I find that I can cut up to one metre at a time very quickly. You need something underneath the fabric to take the burn mark - to which it will adhere where it has been cut, but peels off easily. It is really important to wear a good gas mask when you do this and make sure the room is well ventilated - best do it in the open. The fumes that come off burned polyester fabric are nasty - they really go for my lungs.
Fitting the Fabric
Once the fabric is draped over the boat and one is happy with the orientation and that it will fit etc I turn the boat upside down and stitch the stern seam.

I stitch with just a little tension in the fabric, not much - so that it is not slack, and start the seam by making a crease on the corner which gets bigger and bigger as you go round the corner. By the time the picture above was taken I had trimmed and sealed the excess fabric. I made quite a close stitch using two opposing needles and 1.5mm braided wax polyester twine that I buy from my local Chandlers (Macsalvors of Pool). I was careful to make sure I did not pull the cloth. Once the first run of stitches was done, I folded the cloth over on itself and stitched the seam again, and then once more to make a secure seam that would withstand the tensioning of the fabric without pulling. The clamps would probably remain in place after I had taken the seam round to the deck, as I have yet to do in the photo.
I used to tension the fabric the way they say in all of the books I have read: on your back with the foot against one of the bow deck beams pulling with all your might - and if no one was there to help, wondering how on earth you were going to secure the fabric at the bow.
Instead I cut the fabric to about one foot wide at the bow, with an excess of about one foot in length, and this piece of fabric about one foot square I wrap round a spare piece of wood or batten, clockwise; and then keep turning, tensioning against the point of the bow as is sort of (I would have used two hands and had the clamp nearby, ready) shown below.


As you can see I hold the fabric in place with a spring wrench and it remains there after I have done a seam round to the bow, until I am sure that I will not lose any tension by it's removal. The fabric is protected by the masking tape wrapped round the jaws.
The tension enables the fabric to fit round the bow without creasing, and also puts a great deal of concave into the fabric as it drapes round the chines, as is shown in the final photo.

It also shows how I have pinned the fabric securely to the keel with upholstery pins so that it will not pull holes as I conduct the next part of skinning which is to progressively pull the concaves out of the cloth - next post.
As a full size piece of cloth is unmanageable, the first stage is to determine the approximate dimensions of the cloth to be bent to the boat. This is done by measuring the circumference of the craft at points from the bow to the stern. It is important that the measuring tape from which these points are taken is pulled along the keel and round the curvature of bow and stern to where they meet the deck. You see, the cloth will take this path. If you measure points in a straight line from bow to stern the piece of cloth will be too short.
To the circumference at each point is added four inches. That is for the one inch overlap needed for the rolled seam and two inches spare so as not to have to waste a piece of cloth through having made a mistake in the measurements etc. That measurement is halved and the points plotted either side of a straight line lightly drawn on the fabric. The outline of the piece is drawn through the plotted points.
The shape of the cloth will be something like that shown below:

The irony is that I had forgotten to add the extra two inches of fudge factor to this piece and it did not give me enough overlap so I had to cut another piece. It was not wasted however - I gave it to someone who was making a shorter and narrower boat!
On the floor is the notebook in which I had plotted the dimensions and the pair of Kevlar shears I used to cut the fabric, after which I sealed the edges with a heat gun. Although this was quicker and fume free, I was not satisfied with the quality of the edge, so the next piece was cut with my old method.

This involves the use of an old chisel filed sharp on one corner, heated to red heat with a blow torch. I find that I can cut up to one metre at a time very quickly. You need something underneath the fabric to take the burn mark - to which it will adhere where it has been cut, but peels off easily. It is really important to wear a good gas mask when you do this and make sure the room is well ventilated - best do it in the open. The fumes that come off burned polyester fabric are nasty - they really go for my lungs.
Fitting the Fabric
Once the fabric is draped over the boat and one is happy with the orientation and that it will fit etc I turn the boat upside down and stitch the stern seam.

I stitch with just a little tension in the fabric, not much - so that it is not slack, and start the seam by making a crease on the corner which gets bigger and bigger as you go round the corner. By the time the picture above was taken I had trimmed and sealed the excess fabric. I made quite a close stitch using two opposing needles and 1.5mm braided wax polyester twine that I buy from my local Chandlers (Macsalvors of Pool). I was careful to make sure I did not pull the cloth. Once the first run of stitches was done, I folded the cloth over on itself and stitched the seam again, and then once more to make a secure seam that would withstand the tensioning of the fabric without pulling. The clamps would probably remain in place after I had taken the seam round to the deck, as I have yet to do in the photo.
I used to tension the fabric the way they say in all of the books I have read: on your back with the foot against one of the bow deck beams pulling with all your might - and if no one was there to help, wondering how on earth you were going to secure the fabric at the bow.
Instead I cut the fabric to about one foot wide at the bow, with an excess of about one foot in length, and this piece of fabric about one foot square I wrap round a spare piece of wood or batten, clockwise; and then keep turning, tensioning against the point of the bow as is sort of (I would have used two hands and had the clamp nearby, ready) shown below.


As you can see I hold the fabric in place with a spring wrench and it remains there after I have done a seam round to the bow, until I am sure that I will not lose any tension by it's removal. The fabric is protected by the masking tape wrapped round the jaws.
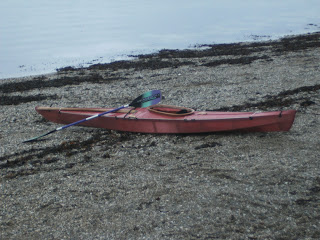
The tension enables the fabric to fit round the bow without creasing, and also puts a great deal of concave into the fabric as it drapes round the chines, as is shown in the final photo.

It also shows how I have pinned the fabric securely to the keel with upholstery pins so that it will not pull holes as I conduct the next part of skinning which is to progressively pull the concaves out of the cloth - next post.
Comments
Post a Comment