Coating the fabric
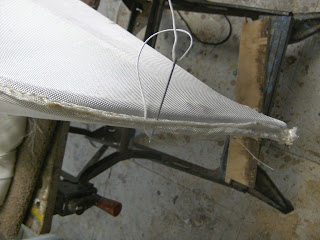
Tidying up a seam before starting the coating
Although mainly cosmetic, trimming excess material from the seam at the stern, and then folding what's left over once more with another row of stitching, made a big difference:
 Coating
This is the third boat I will have coated in epoxy. Prior to that I had used moisture curing polyurethane, which although tough and easy to apply slackened off the fabric too much. Then I tried standard marine enamel straight on to the fabric, again with mixed results.
The down side was that I lost count of the number of coats I had to put on to seal the fabric which was expensive, added a lot of weight and seemed to take for ever. The first time I used the boat it was slightly porous as there was insufficient paint impregnated into the fabric - so I needed to apply more paint; but the surface needed abrading as I was way over the time limit for over-coating without doing this.
The useful thing that came out of this was that I understood that you cannot abrade coatings on a fabric, as doing so pulls bits of fibre onto the surface to create a very rough surface when the next coat goes on - a bit of a disaster really.
On a repair job at about the same time I found that the same thing applies to Kevlar for it is also a fabric: the same thing happened. The way round it was to laminate the kevlar with a layer of 6oz glass cloth over the top. This gave a smoother finish which could be abraded as the glass fibres, unlike those of kevlar which is incredibly tough, could shear off.
I do not think this would work on a skin on frame boat for the stretch characteristics of the fabric and glass might be different resulting on surface cracking (although it might be OK for making a plug). Marine enamel, however works really well as a top coat on top of fabric which has been already sealed with epoxy. This is what I did with the first boat I finished with epoxy.
I had resisted using epoxy for a while for I was concerned about cracking, but was persuaded to give it a go by the fact that its use is built into the building of Geodesic Airolite boats by Platt Montford, and I found it worked out fine. Although an irritant it is less of a health hazard than polyurethane, strong, flexible, easy to work with and economical.
As for this boat and the previous, the customers preferred a semi translucent finish. Thus after primer and filler coats, the kayak was finished with a marine quality varnish instead of marine enamel.
 This picture shows the set up for coating. Far left is the face mask; the 3M 4251 Vapour respirator, which also gives particulate protection, then the rollers to use with the tray to get the coating onto the fabric. You need epoxy proof ones which is better than seeing your roller start to come apart and merge with the coating. Gloves are worn two at a time so that the skin is not exposed if you need to replace the outer pair; these are vinyl, but nitrile are best.
The mixing tub is on top of scales which measures down to one gram, which is OK for mixing more than 100 gm at a time. The resin itself is the standard pack from Reactive Resins; this is a Cornish company which manufactures all sorts of coating products including those for marine applications, about twenty five miles east in Bodmin. They specify measurement of resin (2:1 ratio) by weight. This more accurate and convenient than by volume - hence the scales. I have found their resins to work really well on fabric as they are quite flexible.
In the foreground to the right of the rolling tray is the pigment and a spatula onto which it will be added 0.7 grams at a time, to give a concentration of just under 0.5% when added to the batch size of 150 grams. Although a polyester resin pigment, it is known to work equally well with epoxy at low concentrations. The amount I used was well under the threshold.
The scales supporting the spatula measure down to 0.1 grams which is great for measuring small quantities of epoxy - for example when glueing, and of course for additives like pigment. They only cost me about £10 on ebay. The other, for larger quantities came from Reactive Resins for about the same price.
 This shows the hull after the initial priming coat and before the filler coat. There are few pictures as I find coating rather stressful - you do not want to make any mistakes. For the reasons explained earlier, you cannot sand down and start again.
I was coating something like 4.2 square metres of 440 gm/sq metre fabric. The priming coat for the hull weighed something like 650 gm and the deck 400gm. Filler coat amounted to something like 450 gm for the whole boat, so I used just over 1.5 kg to coat the boat in epoxy. The boat would be fully usable like this but would darken over time from the UV.
The varnish added about another 300 grams weight. I used Timberseal EV epoxy based varnish, again by Reactive Resins. Although the instructions recommended painting to give a nice thick coat, I found that rolling on and then smoothing off with a paintbrush to work better. I could have used this as a filler coat and saved some weight.
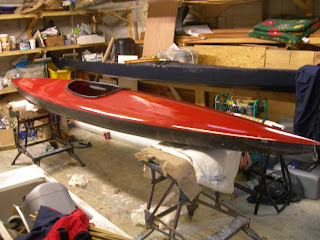
The photograph below shows the sealed and varnished boat with markings for screw points of the deck fittings. The final fitting out will be covered in the next post.

Although mainly cosmetic, trimming excess material from the seam at the stern, and then folding what's left over once more with another row of stitching, made a big difference:


This is the third boat I will have coated in epoxy. Prior to that I had used moisture curing polyurethane, which although tough and easy to apply slackened off the fabric too much. Then I tried standard marine enamel straight on to the fabric, again with mixed results.
The down side was that I lost count of the number of coats I had to put on to seal the fabric which was expensive, added a lot of weight and seemed to take for ever. The first time I used the boat it was slightly porous as there was insufficient paint impregnated into the fabric - so I needed to apply more paint; but the surface needed abrading as I was way over the time limit for over-coating without doing this.
The useful thing that came out of this was that I understood that you cannot abrade coatings on a fabric, as doing so pulls bits of fibre onto the surface to create a very rough surface when the next coat goes on - a bit of a disaster really.
On a repair job at about the same time I found that the same thing applies to Kevlar for it is also a fabric: the same thing happened. The way round it was to laminate the kevlar with a layer of 6oz glass cloth over the top. This gave a smoother finish which could be abraded as the glass fibres, unlike those of kevlar which is incredibly tough, could shear off.
I do not think this would work on a skin on frame boat for the stretch characteristics of the fabric and glass might be different resulting on surface cracking (although it might be OK for making a plug). Marine enamel, however works really well as a top coat on top of fabric which has been already sealed with epoxy. This is what I did with the first boat I finished with epoxy.
I had resisted using epoxy for a while for I was concerned about cracking, but was persuaded to give it a go by the fact that its use is built into the building of Geodesic Airolite boats by Platt Montford, and I found it worked out fine. Although an irritant it is less of a health hazard than polyurethane, strong, flexible, easy to work with and economical.
As for this boat and the previous, the customers preferred a semi translucent finish. Thus after primer and filler coats, the kayak was finished with a marine quality varnish instead of marine enamel.

The mixing tub is on top of scales which measures down to one gram, which is OK for mixing more than 100 gm at a time. The resin itself is the standard pack from Reactive Resins; this is a Cornish company which manufactures all sorts of coating products including those for marine applications, about twenty five miles east in Bodmin. They specify measurement of resin (2:1 ratio) by weight. This more accurate and convenient than by volume - hence the scales. I have found their resins to work really well on fabric as they are quite flexible.
In the foreground to the right of the rolling tray is the pigment and a spatula onto which it will be added 0.7 grams at a time, to give a concentration of just under 0.5% when added to the batch size of 150 grams. Although a polyester resin pigment, it is known to work equally well with epoxy at low concentrations. The amount I used was well under the threshold.
The scales supporting the spatula measure down to 0.1 grams which is great for measuring small quantities of epoxy - for example when glueing, and of course for additives like pigment. They only cost me about £10 on ebay. The other, for larger quantities came from Reactive Resins for about the same price.

I was coating something like 4.2 square metres of 440 gm/sq metre fabric. The priming coat for the hull weighed something like 650 gm and the deck 400gm. Filler coat amounted to something like 450 gm for the whole boat, so I used just over 1.5 kg to coat the boat in epoxy. The boat would be fully usable like this but would darken over time from the UV.
The varnish added about another 300 grams weight. I used Timberseal EV epoxy based varnish, again by Reactive Resins. Although the instructions recommended painting to give a nice thick coat, I found that rolling on and then smoothing off with a paintbrush to work better. I could have used this as a filler coat and saved some weight.
The photograph below shows the sealed and varnished boat with markings for screw points of the deck fittings. The final fitting out will be covered in the next post.


Comments
Post a Comment