Steam Bending Cedar
Steaming with Cedar
The basic frame weighed 9 1/2 kg. As I wanted the completed boat to weigh 18kg or less then the weight of anything else added from now on needed to be kept to a minimum - without sacrificing strength.
That's why I decided to make the cockpit of cedar which I had used to complete the flange (that holds the deck in place) on a hoop before. That bent to shape really well and I remained hopeful that a full cockpit hoop and flange would be equally simple.
As I normally use 3/8" thick oak to make the hoop I considered that 5/8" cedar would be as, if not more strong, and so prepared a couple of pieces just over 1 1/4" deep from my stock of Cornish Cedar.
That I do not have any more pictures of the process than my measuring rope on top of the steam box (fits round the mould and so measures the correct circumference - to which a foot tapered overlap is added at each end) says alot.
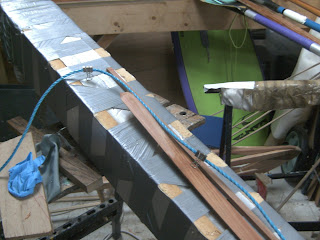
There is a great deal to do and get right in the minute or so in which the wood remains sufficiently pliable to bend after coming out of the steamer. Steam bending is something which is best practiced frequently but rarely done unless you are building a lot of boats with bent ribs.
Finding the right time in the steambox is also part art. Within the adage "1" thickness needs an hour of steaming"; there are variations for hardwoods like oak need longer than softwoods like cedar, and the drier the wood - the longer it needs. Thus the 25 minutes in the box for my first attempt with 5/8"
cedar was probably not enough, for although I eventually pulled it round the mould, I was not able to tightly clamp it all the way round and it came out mis-shapen (shown on top of the second successful attempt in it's mould).

I was successful in steam bending a series of thinner woodstock pieces which were glued with epoxy to give a laminated hoop - still light but stronger.

This was faired and sanded

before the rim/flange was steamed and bent in place,

removed and faired,
 and then glued and clamped in place.

The blue bits on the photo are bits of discarded disposable gloves used to stop the wood buffers under the clamps from sticking to the piece - comes off eventually! The excess epoxy was pared away with a chisel before it set really hard.

The whole top of the rim was faired with a plane, block plane and spokeshave before sanding smooth - next post.
When I have a moment I will use the remaining cedar stock, still soaking in an old drainpipe to make a spare cockpit. Steam bending is skill that needs to be kept alive with practice.
The basic frame weighed 9 1/2 kg. As I wanted the completed boat to weigh 18kg or less then the weight of anything else added from now on needed to be kept to a minimum - without sacrificing strength.
That's why I decided to make the cockpit of cedar which I had used to complete the flange (that holds the deck in place) on a hoop before. That bent to shape really well and I remained hopeful that a full cockpit hoop and flange would be equally simple.
As I normally use 3/8" thick oak to make the hoop I considered that 5/8" cedar would be as, if not more strong, and so prepared a couple of pieces just over 1 1/4" deep from my stock of Cornish Cedar.
That I do not have any more pictures of the process than my measuring rope on top of the steam box (fits round the mould and so measures the correct circumference - to which a foot tapered overlap is added at each end) says alot.

There is a great deal to do and get right in the minute or so in which the wood remains sufficiently pliable to bend after coming out of the steamer. Steam bending is something which is best practiced frequently but rarely done unless you are building a lot of boats with bent ribs.
Finding the right time in the steambox is also part art. Within the adage "1" thickness needs an hour of steaming"; there are variations for hardwoods like oak need longer than softwoods like cedar, and the drier the wood - the longer it needs. Thus the 25 minutes in the box for my first attempt with 5/8"
cedar was probably not enough, for although I eventually pulled it round the mould, I was not able to tightly clamp it all the way round and it came out mis-shapen (shown on top of the second successful attempt in it's mould).

I was successful in steam bending a series of thinner woodstock pieces which were glued with epoxy to give a laminated hoop - still light but stronger.

This was faired and sanded

before the rim/flange was steamed and bent in place,

removed and faired,


The blue bits on the photo are bits of discarded disposable gloves used to stop the wood buffers under the clamps from sticking to the piece - comes off eventually! The excess epoxy was pared away with a chisel before it set really hard.

The whole top of the rim was faired with a plane, block plane and spokeshave before sanding smooth - next post.
When I have a moment I will use the remaining cedar stock, still soaking in an old drainpipe to make a spare cockpit. Steam bending is skill that needs to be kept alive with practice.

Comments
Post a Comment