Footbraces, backstrap and finishing the cockpit
Finishing the cockpit
Following on from the last post, the top and bottom of the cockpit are faired and then as shown below the top and bottom inside corners are well rounded with a spokeshave. This is to make sure that the fabric does not snag when being fitted to the cockpit, and also so that the paddler does not snag getting in and out of the boat.
 Then a support was clamped in a workmate to take the drilling of the thread holes that will secure the fabric inside the cockpit. The holes are drilled and inch apart and a few millimetres below the edge of the rim.


You just see the small epoxy fillet I put round the base of the rim beforehand. The cockpit is then finished off with about two hours hand sanding starting with 60 grade, then 120 and then really fine. It will be coated with the skin.

This photo of the finished cockpit also shows how the back strap is held in place, more of this later.
Footbraces and backstrap
After the first fitting showed the thigh brace to be too far forward this was moved back and lashed and pinned in place after glueing on a couple of thin pads of wood to the ends. This was to fill out the slightly greater beam a couple of inches back.

My initial attempts to support the footbraces added to the growing pile of firewood in a corner. Until

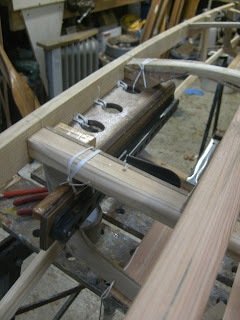
eventually I realized that it was possible to make a support that was held on three sides - to the gunwale and the two deck beams on either side. The photo below shows them about to be epoxied
 with glass tape on the outside of the rounded top edge. You can see in the further of the two, the filleted inside edge. Looking at the nearest of the two - to take the right footpeg; it's right edge adjoins the gunwale, to which it is lashed. The front edge butts against the deck beam in front of the feet, and the nearest edge is held under the next deck beam back. to the inner edge the footbrace is bolted, as shown below.
 That done the heel supports of 1/4" Cedar were lashed to the two frames beneath the deck beams.
 I was half way through fitting the right side one when this photo was taken. Finally the D rings to take the backstrap were lashed to the gunwales. First of I had tried to attach to the frame in front of where I ended up, but the backstrap hung too low to give proper support. Then the frame was "oiled"

with a water based oil that will not prevent adhesion of the epoxy to the wooden surfaces. It's dark colour enabled me to ensure all of the surface is wetted twice.

 And so on to skinning in the next post.
Following on from the last post, the top and bottom of the cockpit are faired and then as shown below the top and bottom inside corners are well rounded with a spokeshave. This is to make sure that the fabric does not snag when being fitted to the cockpit, and also so that the paddler does not snag getting in and out of the boat.


You just see the small epoxy fillet I put round the base of the rim beforehand. The cockpit is then finished off with about two hours hand sanding starting with 60 grade, then 120 and then really fine. It will be coated with the skin.

This photo of the finished cockpit also shows how the back strap is held in place, more of this later.
Footbraces and backstrap
After the first fitting showed the thigh brace to be too far forward this was moved back and lashed and pinned in place after glueing on a couple of thin pads of wood to the ends. This was to fill out the slightly greater beam a couple of inches back.

My initial attempts to support the footbraces added to the growing pile of firewood in a corner. Until

eventually I realized that it was possible to make a support that was held on three sides - to the gunwale and the two deck beams on either side. The photo below shows them about to be epoxied


with a water based oil that will not prevent adhesion of the epoxy to the wooden surfaces. It's dark colour enabled me to ensure all of the surface is wetted twice.


Comments
Post a Comment